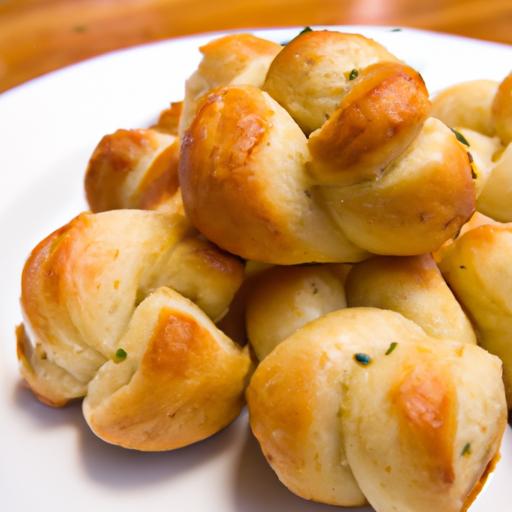
Ther’s a captivating charm in the simple pleasures of homemade bread-especially when it’s twisted into warm, golden garlic knots that fill your kitchen with an irresistible aroma. “Twist and Taste: Mastering Easy Homemade Garlic Knots” invites you to embark on a culinary journey where flour, yeast, and garlic come together in perfect harmony. Weather you’re a seasoned baker or a curious beginner, this guide will unravel the secrets to crafting soft, flavorful knots that melt in your mouth.Prepare to dive into a world where a few basic ingredients transform into an unforgettable snack, perfect for sharing or savoring solo. Let’s roll up our sleeves and twist our way to garlic knot greatness!
Choosing the Perfect Dough for Soft and Fluffy Garlic Knots
Twist and Taste: Mastering Easy Homemade Garlic Knots begins with selecting the ideal dough that yields airiness and tenderness in every bite. The secret lies in using a high-protein all-purpose flour blended with a touch of bread flour or vital wheat gluten to boost gluten development, which ensures that signature chew and softness. A well-hydrated dough-about 65% hydration-combined with a patient, slow fermentation process creates an irresistible texture that gently pulls apart and holds the coating of luscious garlic butter with every twist.
For an approachable and foolproof dough,combine warm water,active dry yeast,sugar,and olive oil to awaken the yeast gently. Then, gradually mix in your flours and salt before kneading until smooth and elastic-about 8-10 minutes by hand or 5 minutes with a mixer fitted with a dough hook. Let it rise in a warm, draft-free environment until doubled, allowing complex flavors to develop and a tender crumb to form.
Crafting the Ultimate Garlic Butter Blend for Maximum Flavor
The soul of these garlic knots is found in a bold, aromatic butter blend that captivates the senses. Use high-quality unsalted butter softened to room temperature to ensure smooth melting, then stir in freshly minced garlic, finely chopped Italian parsley, and a pinch of sea salt. A squeeze of fresh lemon juice adds brightness that beautifully balances the richness of the butter and the pungency of garlic.
To deepen the flavor layers, incorporate a dusting of freshly cracked black pepper and a hint of dried oregano or red pepper flakes. Let this blend rest for at least 15 minutes so those fragrant oils marry perfectly. When brushed generously over the hot knots fresh from the oven, the butter melds into the soft dough, creating a glossy, flavorful glaze that invites a second helping.
Step by Step Techniques to Tie and Bake Picture-perfect Knots
- Divide and Portion: After the dough’s first rise, punch it down gently and divide it into uniform 1.5-ounce pieces to ensure even baking.
- Roll into Ropes: Using lightly floured hands, roll each piece into a 6-inch long rope, keeping the diameter consistent for neatness.
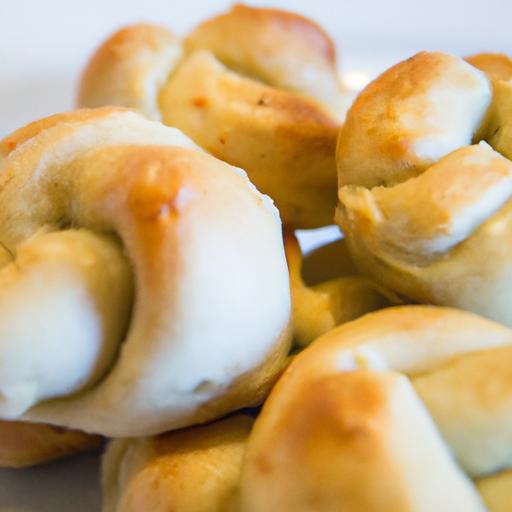
- Form the Knot: Take each rope and tie a loose overhand knot by forming a loop, threading the end underneath, and tucking the tip under the knot-this prevents unraveling while baking.
- Second Rise: Place knots on a parchment-lined baking sheet, cover with a damp towel or plastic wrap, and allow them to rest for 30-45 minutes until puffy and nearly doubled.
- Bake to Golden Perfection: Preheat your oven to 400°F (200°C). Bake the knots for 12-15 minutes or until the crust is golden and slightly crisp, while the interior remains pillowy soft.
- Brush with Garlic Butter: Instantly after removing them from the oven,brush the knots generously with your prepared garlic butter blend for maximum flavor absorption.
- Garnish: Finish with a sprinkle of freshly grated Parmesan (optional) and extra chopped parsley for vibrant color and taste.
Serving Suggestions and Creative Twists to Elevate Your Garlic Knots
These garlic knots shine as a stellar appetizer or side, especially when paired with a hearty marinara or herby pesto dipping sauce. For a crowd-pleasing platter, serve warm in a rustic basket lined with a checked cloth, sprinkled with flaky sea salt and fresh herbs for irresistible visual appeal.
Looking to elevate the classic garlic knot? Try topping them with a sprinkle of smoked paprika or nutritional yeast for a subtle smoky or cheesy twist. For a burst of freshness, drizzle with a balsamic reduction or add finely chopped roasted cherry tomatoes over the garlic butter coating.
For a playful variation, swap the Italian parsley for fresh basil or tarragon, or mix in sun-dried tomatoes and kalamata olives into the dough before shaping. These subtle but inspired adaptations can transform your homemade garlic knots into centerpieces worthy of any table.
Prep and Cook Time
- planning Time: 20 minutes
- Rise Time: 1 hour 30 minutes (including proofing)
- Cooking Time: 15 minutes
- Total Time: Approximately 2 hours
Yield
Yields approximately 20 soft and fluffy garlic knots, perfect for sharing or pairing with your favorite italian dish.
Difficulty Level
Intermediate. While the techniques are straightforward, mastering the dough texture and tying the knots nicely requires a bit of patience and practice.
Ingredients
- For the Dough:
- 2 ¼ teaspoons (1 packet) active dry yeast
- 1 cup warm water (105°F-110°F)
- 1 tablespoon granulated sugar
- 2 cups all-purpose flour, sifted
- 1 cup bread flour
- 1 teaspoon fine sea salt
- 2 tablespoons extra virgin olive oil
- For the Garlic Butter Blend:
- 6 tablespoons unsalted butter, softened
- 4 cloves garlic, finely minced
- 2 tablespoons fresh Italian parsley, finely chopped
- 1 teaspoon freshly squeezed lemon juice
- ½ teaspoon sea salt
- ¼ teaspoon black pepper
- ¼ teaspoon dried oregano (optional)
- Pinch of red pepper flakes (optional)
Instructions
- Activate the Yeast: In a small bowl, combine warm water, sugar, and yeast. Stir gently and let it sit for 5-10 minutes until foamy.
- Mix the Dough: In a large bowl, whisk together both flours and salt. Create a well in the center and pour in the yeast mixture and olive oil.
- Knead: mix until a shaggy dough forms, then knead on a floured surface for 8-10 minutes until smooth and elastic. Alternatively, use a stand mixer with a dough hook on medium speed for 5 minutes.
- First Rise: Place dough in a lightly oiled bowl, cover with a clean kitchen towel, and let it rise in a warm spot until doubled in size, about 1 hour.
- Prepare the Garlic Butter: While the dough rises, combine softened butter, minced garlic, parsley, lemon juice, salt, pepper, oregano, and red pepper flakes in a small bowl. mix until well blended. set aside.
- Shape the Knots: Punch down the dough and divide into 20 equal pieces (about 1.5 ounces each). Roll each into a 6-inch rope and tie an overhand knot, tucking the end underneath.
- Second Rise: Arrange knots on a parchment-lined baking tray. Cover and let rest for 30-45 minutes until puffy.
- Bake: Preheat oven to 400°F (200°C). Bake knots for 12-15 minutes or until golden brown.
- Brush: Remove from oven and immediately brush with the garlic butter blend. Sprinkle with additional parsley or Parmesan if desired.
- serve Warm: Enjoy fresh out of the oven for the ultimate soft, garlicky experience.
Chef’s Notes & Tips for Success
- Use lukewarm water to activate yeast-too hot will kill it, too cold slows rising.
- kneading well is key to developing gluten for a chewy yet soft bite.
- If you prefer a tender crumb, try a cold overnight fermentation in the fridge; this enhances flavor complexity.
- Allergic to butter or vegan? Substitute with a flavorful olive oil and garlic drizzle.
- Don’t skip brushing knots immediately-this locks in moisture and flavor while adding a delectable sheen.
Serving Suggestions
- serve alongside a steaming bowl of tomato basil soup or a fresh Caesar salad for a comforting meal.
- Pair with a robust marinara or homemade pesto dipping sauce to highlight the garlic flavor.
- For party platters, place knots in parchment-lined baskets, garnish with chopped parsley and a dusting of Parmesan.
- Try topping with sautéed mushrooms or roasted bell peppers for an elevated savory snack.
| Nutrient | Per knot (approx.) |
|---|---|
| Calories | 110 kcal |
| Protein | 3 g |
| Carbohydrates | 14 g |
| Fat | 5 g |
For more expert baking tips, check our step-by-step pizza dough guide. To dive deeper into the science behind yeast bread baking, visit King Arthur Baking Science Guide.

Q&A
Q&A: Twist and Taste – Mastering Easy Homemade Garlic Knots
Q1: What makes garlic knots such a beloved treat?
A1: Garlic knots are the perfect blend of soft, pillowy dough and a punch of savory garlic flavor, all wrapped up in a golden, buttery twist.Their irresistible aroma and easy-to-hold shape make them an ideal companion for soups, salads, or a cozy snack.
Q2: Can I make garlic knots from scratch even if I’m a beginner baker?
A2: Absolutely! Homemade garlic knots are surprisingly simple.With just a few basic ingredients-flour, yeast, water, olive oil, garlic, and herbs-you can whip up a batch in no time. The key is a little patience with dough rising and gentle hands when tying the knots.
Q3: What type of dough works best for garlic knots?
A3: A soft pizza dough or bread dough is ideal. the dough should be elastic and slightly sticky,allowing it to stretch and form knots without tearing. Using bread flour can give the knots an airy chew, while all-purpose flour works fine for a tender bite.
Q4: How do you achieve that perfect golden-brown crust?
A4: Brushing the knots with olive oil or melted butter before baking helps develop a luscious crust.Baking at a high temperature-around 400°F (200°C)-ensures they turn beautifully golden and crisp on the outside while staying soft inside.
Q5: What flavors can I add to the garlic knot topping?
A5: Classic garlic, fresh parsley, and a sprinkle of sea salt are timeless. For a twist, try adding grated Parmesan cheese, a pinch of crushed red pepper flakes for heat, or even a touch of lemon zest to brighten the flavor.
Q6: Can I prepare garlic knots in advance?
A6: Yes! You can prepare and knot the dough ahead, refrigerate it overnight, and bake fresh knots the next day.Alternatively, fully baked garlic knots freeze beautifully-just reheat them in the oven for a warm, fresh-tasting treat anytime.
Q7: What dipping sauces pair well with garlic knots?
A7: garlic knots invite a variety of companions. Marinara sauce, creamy pesto, or even a tangy ranch dip are crowd-pleasers. Try experimenting with olive oil infused with herbs or roasted garlic for an elegant touch.
Q8: Are there creative ways to shape garlic knots?
A8: Beyond the classic twist, try braiding small strips of dough or rolling them into bite-sized spirals. Each shape offers a slightly different texture and presentation,perfect for entertaining or customizing your baking experience.
Q9: How do I avoid over-greasing that makes knots soggy?
A9: Use just enough butter or oil to coat the dough lightly. It’s best to brush the topping after baking while the knots are still warm, preserving that desirable crispness and buttery shine without dampness.
Q10: What’s the secret to realy infusing garlic flavor into the knots?
A10: Infuse your olive oil or melted butter with freshly minced garlic by gently warming them together before brushing onto the knots. This gentle heat releases the garlic’s aromatic oils without burning, resulting in a richly flavored crust.
Embrace the simple joy of twisting dough and savoring warm garlic knots fresh from your oven-each bite an invitation to share comfort, flavor, and a little culinary magic.
Closing Remarks
As you tie up your last knot and savor that first warm, garlicky bite, remember that mastering homemade garlic knots is more than just a recipe-it’s a delicious adventure in simplicity and flavor. With a few pantry staples and a touch of patience, you’ve unlocked a timeless treat that brings aroma and comfort to any table. So whether you’re serving them alongside pasta, dipping them into marinara, or enjoying them straight from the oven, let these easy garlic knots be your new go-to twist on homemade delights. Happy baking, and may your kitchen always smell of fresh garlic and warm dough!