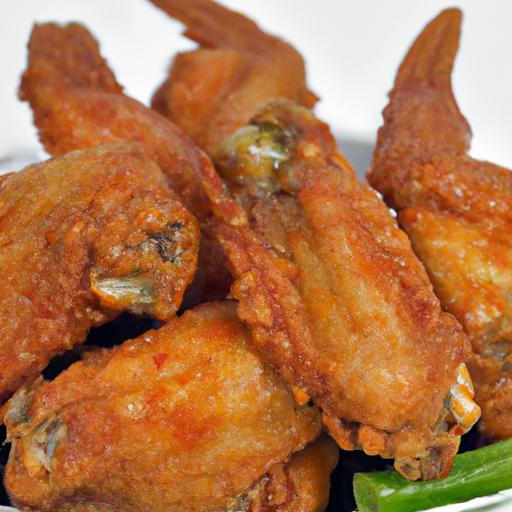
There’s something undeniably irresistible about chicken wings-crispy on the outside,juicy and tender on the inside,bursting with flavor in every bite. Yet, achieving that perfect balance in the oven can feel like a culinary mystery worthy of decoding. Whether you’re a seasoned home cook or a poultry enthusiast eager to elevate your snack game,mastering the art of baking chicken wings unlocks a world of delicious possibilities without the mess of frying. In this article, we’ll unravel the secrets behind creating wings that boast a golden, crackling crust while locking in mouthwatering juiciness, transforming your kitchen into a wing lover’s paradise. Get ready to bake your way to crispy perfection!
Choosing the Perfect Chicken wings for Ultimate Crispiness
Crispy & Juicy chicken wings start with selecting the right wings, setting the stage for that irresistible crunch and tender bite. Opt for fresh, whole chicken wings including the drumette and wingette sections, preferably with the skin intact. Skin retains moisture while crisping beautifully in the oven-skinless wings simply won’t deliver the same satisfying texture or flavor depth.
When possible, choose wings that are uniform in size to ensure even cooking. If buying frozen,thaw thoroughly and pat dry to eliminate excess moisture on the skin,which can prevent proper crisping.This crucial first step guarantees each bite embodies that perfectly balanced contrast of crisp exterior and juicy interior every time.
The Science behind Achieving Juicy Wings Every Time
Understanding the science behind baking wings is a secret weapon in your culinary arsenal. The key lies in maintaining moisture inside the meat while coaxing the skin to crisp to golden perfection. Wings are rich in connective tissue and fat, which render down during cooking and keep the meat juicy.
One technique is to dry-brine your wings by seasoning them with salt and letting them rest uncovered in the fridge for several hours or overnight. This draws out moisture, then allows it to be reabsorbed, resulting in deeper flavor and a firmer but juicy texture. Using baking racks to elevate wings lets hot air circulate evenly, drying the skin further and ensuring all-over crispiness.
Essential Seasoning Techniques to Elevate Your Flavor profile
flavor amplification is crucial. Start with a simple but effective dry rub that enhances rather than overpowers the wings’ natural taste. Use kosher salt, freshly ground black pepper, garlic powder, and smoked paprika as basics. Incorporate a subtle touch of baking powder-not baking soda-which raises the skin’s pH level, helping it brown and crisp without altering flavor.
Don’t shy away from experimenting with spices like cayenne, onion powder, or dried herbs to customize your profile. Toss wings thoroughly in the seasoning mixture to coat every crevice, ensuring layered flavor.For a final zing, consider finishing with a light brush of chili-lime or honey mustard glaze after baking, adding complexity and mouthwatering sheen.
Oven Temperature and Timing Secrets for Perfectly Baked Wings
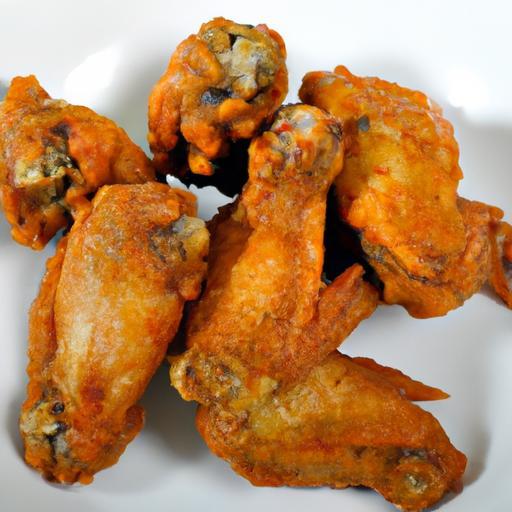
The oven’s heat is your ultimate ally in achieving crispy and juicy wings. Preheat your oven to a steady 425°F (220°C), which optimally renders fat while crisping the skin without overcooking the meat. Placing wings on a wire rack atop a baking sheet helps excess fat drip away and encourages even browning on all sides.
Bake for approximately 40-45 minutes, flipping halfway through to promote uniform crispness. Use a meat thermometer to check for an internal temperature of 165°F (74°C) to guarantee safety and juiciness. If you crave an extra crunch finale, broiling for 2-3 minutes at the end crisps edges beautifully-just watch closely to avoid burning.
Prep and cook Time
- Prep: 15 minutes (plus 4-12 hours dry-brining optional)
- Cook: 40-45 minutes baking + 2-3 minutes broiling (optional)
Yield
Serves 4 generously (about 2 lbs wings)
Difficulty Level
Easy to Medium – Perfect for wing lovers of all skill levels
Ingredients
- 2 lbs fresh chicken wings, thawed if frozen and patted dry
- 1 tbsp kosher salt
- 1 tsp baking powder (aluminum-free)
- 1 tsp smoked paprika
- 1 tsp garlic powder
- 1/2 tsp freshly ground black pepper
- Optional: pinch cayenne pepper for heat, or 1 tsp dried thyme for an herbal note
- Glaze suggestion: 2 tbsp honey mixed with juice of 1 lime (brushed after baking)
Instructions
- Prepare your wings: Rinse briefly and pat wings completely dry with paper towels to remove all surface moisture. This step is critical for crispiness.
- Mix dry brine and seasoning: In a large bowl, combine kosher salt, baking powder, smoked paprika, garlic powder, black pepper, and any optional spices. Stir well.
- Coat the wings: Toss wings in the seasoning mixture until evenly coated. Spread wings out on a wire rack set over a baking sheet. For best results, refrigerate uncovered for 4 to 12 hours to dry-brine-the skin will become taut and the flavor deepens.
- Preheat the oven: Set your oven to 425°F (220°C).Line another baking sheet with foil for easy cleanup.
- Arrange wings on rack: Place the wings skin-side up on the wire rack over the lined baking sheet, ensuring they are spaced apart for optimal air circulation.
- Bake: Insert the baking sheet in the oven and bake for 20-22 minutes. Flip each wing and continue baking for another 20-23 minutes until skin is golden and crisp, and internal temperature reaches 165°F (74°C).
- Optional broil: For extra crunch, broil wings on high for 2-3 minutes, closely monitoring to avoid burning.
- Finishing touch: Remove wings from oven. brush lightly with the honey-lime glaze for a vibrant finish or serve dry-rubbed for classic crunch.
- Rest and serve: Let wings rest for 5 minutes before serving-this helps juices redistribute, maintaining perfect moistness inside.
Tips for Success
- Dry wings thoroughly: Pat them down multiple times with fresh paper towels.
- Choose aluminum-free baking powder: it prevents any off-flavors and ensures ideal crisping.
- Use a wire rack: Avoid placing wings directly on a baking sheet to stop sogginess from rendered fat pooling.
- Customize seasoning: Try infusing a smoked chipotle powder or lemon zest to tailor your wings to your flavor preference.
- Make ahead: dry-brine wings the day before, then bake them fresh when ready. The resting time unleashes superior flavor and texture.
- Internal temperature matters: Use an instant-read thermometer to avoid overcooking and drying out your wings.
Serving Suggestions
serve these Crispy & Juicy chicken wings piled high on a rustic wooden board or vibrant platter. Offer sides of cooling ranch or creamy blue cheese dressing alongside crunchy celery sticks and bright carrot ribbons. Garnish with a sprinkle of finely chopped fresh parsley or chives for color and a mild herbal finish.
For a smoky twist, consider a dusting of smoked salt or a hint of freshly cracked black pepper just before serving. These wings are perfect for game day, casual get-togethers, or anytime you crave that unbeatable crisp-and-juicy bite.

| Nutrient | Per Serving |
|---|---|
| Calories | 320 kcal |
| Protein | 32 g |
| Carbohydrates | 2 g |
| Fat | 22 g |
For more ways to elevate your poultry dishes and achieve perfect crunchy textures, check out our Ultimate Roast Chicken Tips. For detailed scientific insights on meat cooking temperatures and safety, visit FoodSafety.gov.
Q&A
Q&A: Crispy & Juicy – Mastering the Art of Baking Chicken wings
Q1: What’s the secret to achieving crispy skin on baked chicken wings without frying?
A1: The secret lies in a few key techniques: drying the chicken wings thoroughly before baking, using a light coating of baking powder (not baking soda) to encourage browning and crispiness, and baking them at a high temperature.Baking powder helps to break down the proteins on the skin’s surface, which crisps up beautifully in the oven.
Q2: How do you keep the inside of the wings juicy while getting that desirable crisp outside?
A2: Perfectly juicy wings come from balancing heat and time. Baking at a high temperature (around 425°F or 220°C) for about 40-45 minutes allows the skin to crisp up quickly while locking in the natural juices. Additionally, letting wings rest for a few minutes after baking helps redistribute those juices so every bite is tender and flavorful.
Q3: Should I marinate my chicken wings before baking, or does that affect the crispiness?
A3: Marinating is a flavorful option, but wet marinades can sometimes hinder crispness if the wings aren’t patted dry afterward. To keep your wings crispy, marinate for 30 minutes to a few hours, then rinse lightly and thoroughly pat dry before applying your bake-friendly coating.
Q4: Can I use foil or parchment paper when baking wings to prevent sticking and cleanup?
A4: Absolutely! Using foil or parchment paper on your baking sheet can make cleanup a breeze. Though, be sure to lightly oil the foil or parchment to prevent sticking, which can tear the crispy skin when removing the wings.
Q5: What are some creative spice blends or seasonings that enhance baked chicken wings?
A5: The sky’s the limit! Classic choices include garlic powder, smoked paprika, cayenne, black pepper, and salt. For a sweet and spicy twist, try a combination of honey, chili flakes, and cinnamon.or venture into international flavors with curry powder, cumin, and coriander for a warm, aromatic profile.
Q6: Is it better to bake wings on a wire rack or directly on the baking sheet?
A6: Baking on a wire rack elevates the wings, allowing hot air to circulate beneath them, which promotes even cooking and crispiness all around. If you don’t have a rack, flipping the wings halfway through baking will help, but the rack method usually yields the crunchiest results.
Q7: How can I tell when my baked chicken wings are perfectly cooked?
A7: Use a meat thermometer for the most reliable results – the internal temperature should reach 165°F (74°C). Visually,look for golden-brown,crisp skin and juices running clear. The skin should feel tight and crackly to the touch.
Q8: What are some delicious dipping sauces that pair well with crispy baked wings?
A8: Classic buffalo, tangy barbecue, cool ranch, or zesty lemon-garlic aioli are all fantastic choices. For a refreshing contrast, try a cucumber-yogurt dip or a spicy mango salsa – both add vibrant flavor to each bite.
Q9: Can I prepare wings ahead of time and reheat them without losing crispiness?
A9: Yes, prep your wings in advance and store them in the fridge uncovered or loosely covered to maintain some crispness. Reheat them in a preheated oven or toaster oven at 400°F (205°C) for 5-10 minutes. Avoid microwaving, which tends to turn crispy skin rubbery.
Q10: Are there any tips for baking large batches of wings evenly?
A10: Space wings out on your baking racks or sheets to ensure proper air circulation; overcrowding causes steaming and sogginess.If needed, bake in batches rather than overcrowding a single tray. Rotate trays front to back and top to bottom halfway through baking for consistent results.
The Way Forward
As you embark on your journey to master the art of baking chicken wings, remember that the perfect balance of crispy skin and juicy meat lies in the details-the right marinade, precise oven temperature, and a patient, loving hand. With these tips in your culinary toolkit, each batch you create will be a party of texture and flavor, satisfying cravings and impressing guests alike. So preheat that oven, gather your favorite spices, and let the irresistible aroma of golden, crackling wings fill your kitchen-as great wings aren’t just cooked, they’re crafted. Happy baking!