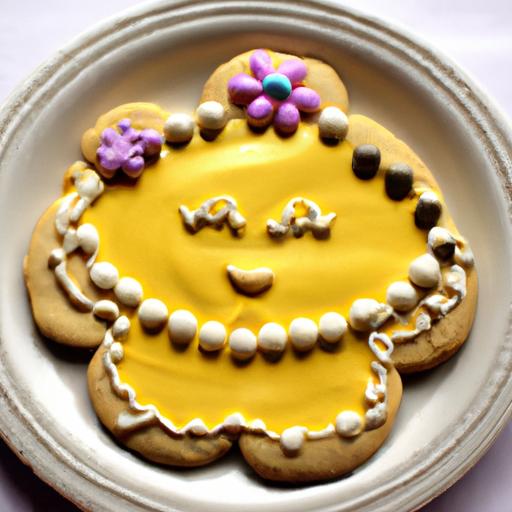
There’s something undeniably magical about biting into a sugar cookie that feels as unique as a handwritten note or a cherished keepsake. Enter the enchanting world of personalized sugar cookies-a delightful fusion of culinary craftsmanship and artistic expression. From vibrant colors that dance on delicate icing to intricate designs that tell heartfelt stories, these sweet edible canvases have transformed a simple treat into a beloved form of party and connection. In this article,we’ll explore how bakers blend creativity,precision,and passion to turn humble sugar cookies into unforgettable works of personalized art. Whether you’re a curious newcomer or an aspiring decorator, prepare to discover the sweet expressions behind these charming confections.
Sweet Expressions: The art of Personalized Sugar Cookies
Sweet expressions start with the perfect base, and when crafting personalized sugar cookies, selecting the ideal dough sets the stage for your edible masterpieces. Whether you’re aiming for crisp edges, tender centers, or a smooth canvas for intricate royal icing, understanding the dough’s nuances can elevate your cookie decorating experience dramatically.
Prep and Cook Time
- Preparation: 20 minutes
- Chilling: 1 hour
- Baking: 8 – 10 minutes per batch
- Total Time: Approximately 1 hour 30 minutes
Yield
Approximately 24 medium-sized cookies (about 3 inches each)
Difficulty Level
Medium – Perfect for bakers agreeable with multi-step processes including rolling, cutting, and decorating with precision.
Ingredients
- 2 ¾ cups all-purpose flour, sifted
- 1 teaspoon baking powder
- ½ teaspoon salt
- 1 cup unsalted butter, softened to room temperature
- 1 ¼ cups granulated sugar
- 1 large egg
- 1 teaspoon pure vanilla extract
- ½ teaspoon almond extract (optional, enhances depth)
- 2-3 tablespoons milk, if needed for dough consistency
- Royal Icing: 3 cups powdered sugar, 2 large egg whites (or pasteurized meringue powder equivalent), ½ teaspoon cream of tartar, and food coloring of choice
Instructions
- Mix dry Ingredients: In a medium bowl, whisk together the flour, baking powder, and salt. This ensures even distribution of leavening agents and seasoning.
- Cream Butter and Sugar: Using a stand mixer or hand mixer, beat the butter and sugar on medium speed until light and fluffy, about 3 to 4 minutes, scraping down the sides as needed.
- Add Egg and Extracts: beat in the egg, vanilla extract, and almond extract until fully incorporated, which imparts a subtle aroma that complements your cookie canvas.
- Combine Dry and Wet: Gradually add the dry ingredients to the wet mixture on low speed. If the dough feels crumbly or dry, add milk one teaspoon at a time to bring it together, aiming for a pliable, non-sticky dough.
- Chill the Dough: Shape into a disc, wrap tightly in plastic wrap, and refrigerate for at least 1 hour. Chilling solidifies the fats, preventing excessive spread and promoting a clean edge.
- Roll Out the Dough: on a lightly floured surface,roll dough to about ¼-inch thickness. A consistent thickness creates uniform baking and a smooth icing surface.
- Cut Shapes: Use cookie cutters to carve your personalized designs. Transfer shapes carefully using a thin spatula to a baking sheet lined with parchment paper.
- Bake: Preheat the oven to 350°F (175°C). Bake cookies for 8-10 minutes or until edges are just golden. avoid over-baking to maintain a tender center optimal for decorating.
- Cool Completely: Let cookies cool on the baking sheet for 5 minutes before moving to wire racks. Completely cool to prevent royal icing from melting.
- Prepare Royal Icing: Beat egg whites (or meringue powder) with powdered sugar and cream of tartar until stiff peaks form. Divide and tint with gel food colors to match your creative vision.
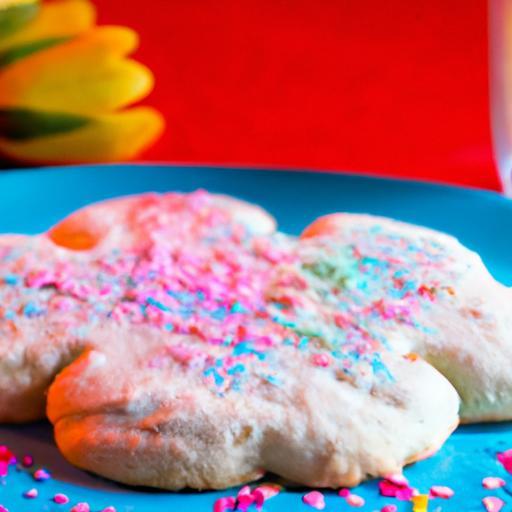
- Decorate: Flood cookies with a base color using a piping bag or squeeze bottle. After drying, add intricate piping, dots, lines, or lettering to tell your customized story.
Chef’s Notes: Tips for Success with Sweet Expressions
- Dough Texture: Avoid overmixing once the flour is added; this maintains tenderness and prevents tough cookies.
- Chilling Matters: Never skip the chilling step – it’s key for handling smooth edges and preventing excessive cookie spread.
- Alternative Flavors: Swap almond extract for lemon or orange zest for unique twists that reflect personal stories.
- Royal Icing Consistency: For outlining, use a thicker consistency; for flooding large areas, thin the icing slightly with water to create a smooth canvas.
- Make-Ahead: Dough can be frozen for up to 3 months. royal icing dries best at room temperature and can be stored airtight in the fridge up to a week.
Incorporating Color and Flavor
When elevating your cookie art, remember that vibrant colors start with gel-based food coloring. Unlike liquid dyes, gels won’t alter icing consistency. For natural flavor bursts, infuse your dough with subtle essences-such as lavender, citrus zest, or even espresso powder for a sophisticated palette. Layer colors strategically: a pale base with bold accents creates depth and visual excitement.
Serving Suggestions
Present your sugar cookies on a decorative platter lined with parchment and accented with fresh edible flowers or delicate sprinkles that match the theme. They make notable gifts when wrapped individually in cellophane bags tied with a satin ribbon and a handwritten note telling the personal story behind the design. Pair these charming treats with a hot cup of chai latte or a sparkling lemonade to enhance the sensory experience.
| Nutrient | Per Cookie | Daily value% |
|---|---|---|
| Calories | 130 | 6% |
| Protein | 2g | 4% |
| Carbohydrates | 18g | 6% |
| Fat | 6g | 9% |
For more on decorating techniques and advanced royal icing skills, explore our Royal Icing Masterclass. For inspiration and tips on color blending, check out this extensive guide from Serious Eats.

Q&A
Q&A: Sweet Expressions – The Art of Personalized Sugar Cookies
Q1: What makes personalized sugar cookies stand out from traditional cookies?
A1: Personalized sugar cookies transform a simple treat into a heartfelt message. With custom shapes,designs,and edible artwork,these cookies become sweet storytellers – each one crafted uniquely to express emotions,celebrate events,or showcase creativity.
Q2: How did the art of decorating sugar cookies evolve into a personalized craft?
A2: While sugar cookies have been enjoyed for centuries, the rise of intricate icing techniques and food coloring innovation turned basic baking into an artistic endeavor. Coupled with social media sharing and demand for bespoke treats, decorators began pushing the boundaries, turning cookies into mini canvases for personal expression.
Q3: What are the essential tools needed to start personalizing sugar cookies?
A3: To embark on this creative journey, bakers generally need basic essentials: quality cookie cutters in fun shapes, royal icing or buttercream for smooth decorating, piping bags with assorted tips, edible color gels, and of course, plenty of patience and imagination!
Q4: Can beginners achieve professional-looking personalized sugar cookies?
A4: Absolutely! While mastery comes with practice, even novices can create stunning cookies by starting with simple designs-like initials or basic patterns-gradually layering techniques. Tutorials, templates, and guided kits can fast-track one’s skills, turning sweet dreams into edible art.
Q5: How do personalized sugar cookies enhance celebrations or gifts?
A5: Personalized sugar cookies add a memorable and edible touch to any occasion. Whether spelling out “Happy Birthday,” matching a wedding palette,or depicting favorite hobbies,these cookies create a unique connection between the giver and receiver,making moments sweeter and more meaningful.
Q6: Are there any tips for keeping personalized sugar cookies fresh and beautiful?
A6: To preserve both flavor and design, store cookies in an airtight container once fully dried. Layer cookies with parchment or wax paper to avoid smudging.For gifting, packaging in clear boxes or cellophane bags with ribbons not only protects but also showcases the edible artwork elegantly.
Q7: Beyond the look, how crucial is flavor in personalized sugar cookies?
A7: Flavor is the soul inside the art. While decorating steals the spotlight, the cookie’s taste forms the lasting impression. Balancing sweetness with vanilla, almond, or subtle citrus notes can elevate the experience and ensure these personalized treats delight both eyes and palates.Q8: what creative trends are shaping the future of personalized sugar cookies?
A8: Current trends include 3D elements, hand-painted designs, and themed cookie sets that tell a story. Eco-friendly edible inks and natural colorants are gaining popularity, reflecting a mindful approach. Plus, interactive cookies-like puzzles or mix-and-match pieces-are making the sweet expressions even more fun and engaging.
Embark on your own sweet expression adventure and discover how a humble sugar cookie can become a masterpiece of personalized joy!
Wrapping Up
As the final sprinkle settles and each delicate detail comes to life, personalized sugar cookies reveal themselves as more than just a sweet treat-they are miniature masterpieces, edible expressions of creativity and care.Whether crafted for celebrations, gifts, or simply the joy of baking, these charming confections invite us to slow down, savor the process, and share a piece of ourselves with others. In the world of sugar cookies,every design tells a story,and every bite is a reminder that art can be both beautiful and delicious. so next time you reach for that rolling pin,remember: you’re not just baking cookies-you’re crafting sweet expressions that delight the senses and warm the heart.